microPAM-T4 software#
Requirements#
While the hardware is mainly based on COTS components with some minor soldering, the software follows different requirements. For the microPAM system I try to satify following requirements
simple structure
easy to be modified
easy to be used
Implementation#
As the hardware is based on a Teensy MCU, which are build to allow programming in the Arduino environment, it makes sense to build the microPAM software also within the Arduino environment, with two small but significant additions:
Avoid Arduino characteristic pre-processor
Allow building of the software without Arduino development interface.
This addition results in pure C/C++ programming (no use of *.ino files) and in the preparation of a makefile that compiles the program. The Arduino environment may then only be used for compilation and downloading.
Arduino compatible c++ programming#
The first change to standard Arduino programming is to avoid the use of *.ino files. Only the main microPAM.ino file must be present in the microPAM directory to please the Arduino programming environment. This file can, however, be completely empty. All source code is collected in a ‘src’ sub-directory as *.c++ and *h files. When compiling from Arduino environment all these files (also the ones in the ‘src’ sub-directory) will be compiled and linked using the standard gnu-arm compiler tool chain. Obviously, the same compiling process can be carried out using makefiles. This alternative approach allows the use of modern program editors (e.g. Visual Studio Code).
Avoiding Arduino programming environment requires that the c/c++ programs are corectly implemented, in particular all variables and functions must be declared before being used.
microPAM source code#
in the following only the main program will be discussed in detail, all supporting functions are given in repository.
Main program#
The main program is kept as simple as possible. Most of the processing activities are in separate files that will be included into the main program at a later stage.
First, some basic system library defines are included:
#include <Audio.h>
#include <Wire.h>
#include <SPI.h>
#include <SD.h>
#include <SerialFlash.h>
After the system library defines the most relevant definitions are made in form of defines and constants.
#define START_MODE 0

#define DO_COMPRESS 1
#define NSAMP 128
#define NBUF 16

#define CPU_RESTART_ADDR (uint32_t *)0xE000ED0C
#define CPU_RESTART_VAL 0x5FA0004
#define CPU_RESTART (*CPU_RESTART_ADDR = CPU_RESTART_VAL)

const int32_t fsamp=44100;
const int32_t nch=1;
const int32_t t_acq=60;
const int32_t t_on=300;
const int32_t t_off=0;
const int32_t shift=14;


const char *DirPrefix = "D";
const char *FilePrefix = "F";
The meaning of the arameters is as follows:
Defines:
START_MODE: set to 0 to start filing immediately; set to -1 to wait for Serial and start filing manually
DO_COMPRESS: set to 1 to lossless compress acousttic data, set to 0 to file raw data
NBUF: number of samples in audio block (128 as fixed in Teensy Audio library)
NBUF: number of audio blocks collected for each file-write operation
The CPU_RESTART_XXX definitions are of use for restarting the MCU from terminal
Constants:
fsamp: sampling frequency, which initially is kept fixed at 44.1 kHz to be consistent with the Teensy audio infrastructure
nch: number of audio channels, which is set to 1 when using a single microphone
t_acq: the duration of each audio file in seconds
t_on: duration of continuous acquisition sequence in seconds
t_off: interval between aquisition sequences in seconds (0 means continuos aquisition)
shift: indicates right shift of I2S data for filing (14 corresponds to 18 bit I2S data)
The t_on, t_off pair allows time gated acquisition (not implemented yet and ignored here), but more complex timed acquisitions are possible.
The DirPrefix and FilePrefix can be adapted to user specific strings.
The following three includes insert the source code needed for I2S acquisition, data compression, and filing.
#include "I2S_32.h"
#include "compress.h"
#include "filing.h"
The I2S_32 include file contains a customized version of the Teensy audio library object “AudioInputI2S”, the file “compress.h” contains a custom loss-less compression and “filing.h” contains the functions needed to save the aquired data to uSD cards.
The modification of the “AudioInputI2S” object allows a more flexible 16-bit data extraction from the 24-bit acoustic words provided by the I2S-MMEMS microphone. The original version extracts the top 16 bit, which does not consider that at least 18 bits are acoustically usefull. Also, as the modified vestion substracts the DC bias from the sensor data.
The next lines define the audio acquisition, which consists of two parts, one being the declaration of the different audio modules, followed by declarations on how these modules are connected together.
I2S_32                   acq;
AudioOutputUSB           usb1;
AudioRecordQueue         queue1;
#if DO_COMPRESS==1
  AudioCompress            proc;
#endif

AudioConnection          patchCord1(acq, 0, usb1, 0);
AudioConnection          patchCord2(acq, 1, usb1, 1);
#if DO_COMPRESS==1
  AudioConnection          patchCord3(acq,  0, proc, 0);
  AudioConnection          patchCord4(proc, 0, queue1, 0);
#else
  AudioConnection          patchCord4(acq, 0, queue1, 0);
#endif
These connections are to be read in the following way: The data are acquired by the I2S_32 module and both channels are passed to the USB output modul. The left channel (channel 0) is in compress mode also passed to the AudioCompress module, the result of which is passed to a record queue.
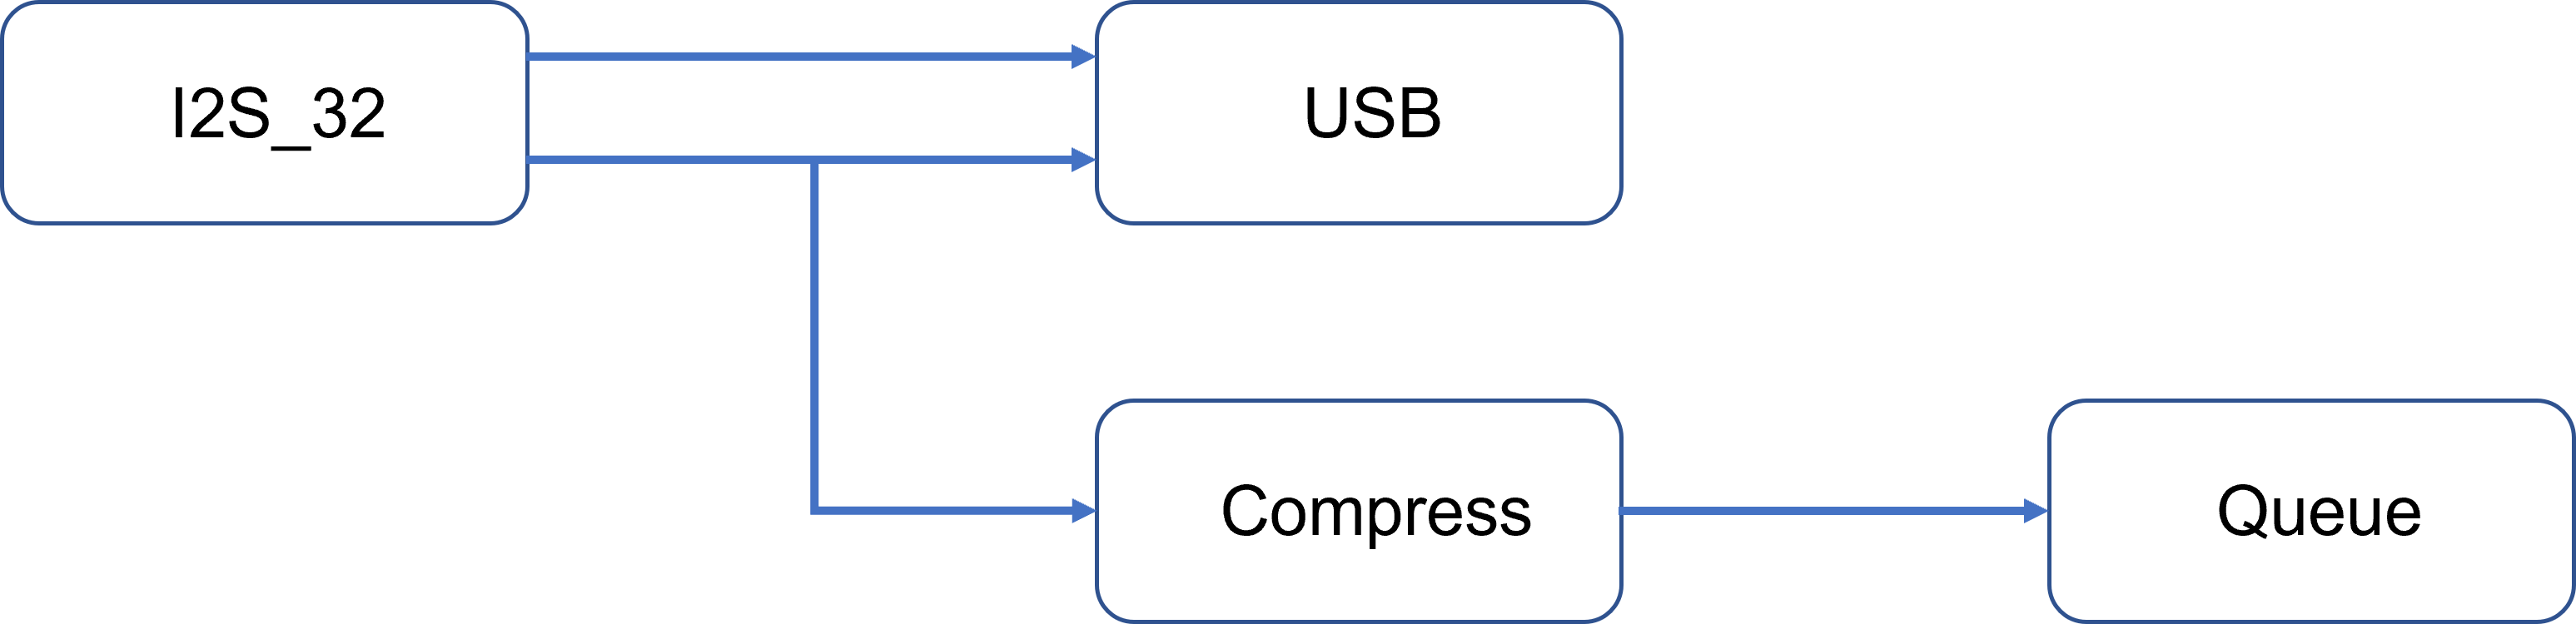
in case of no compression, the acq data are directly send to the record queue.
Once defined, the audio processing will start and continuously without further interaction, with the exception that the RecordQueue object is initially in stopped condition and must be started programmatically. The audio processing is completely interrupt driven and is executed at an elevated priority level.
Next come two functions, that are typical for Arduino programs
setup()
loop()
The setup() function is called from a hidden main() object once, while the loop() function is called without interruption. While it would be possible to declare an own main() object, the choice of setup() and loop() facilitates the implementation by seperating initialization from continuous operations. The loop() function is only called and execudet if there are no elevated interrupt routines serviced.
void setup() {
  // put your setup code here, to run once:
  AudioMemory(60);
  acq.digitalShift(shift);

  SerNum=getTeensySerial();

  #if STARTMODE==-1
    while(!Serial);
  #endif

  storeBegin();

  queue1.begin();
}
The setup() function executes the following actions
allocate the memory to the audio processing chain. The number 30 indicated that the audio modules can access 30 128-word blocks of memory
tell the acquision module to shift the data by 10 bits to the right. This is equivalent to dividing the acoustic data that occupy the top 24 bit of an 32-bit word by a factor of 4 (2 = 10 - 8 bits).
obtain the unique Teensy Serial number to allow discrimination of different microPAM systems
wait for USB-Serial to show connection to PC
connect to uSD card
start RecordQueue object
The following loop function that is called and executed whenever no priotized functions are running
extern int16_t srcData;
extern int32_t acqData;
extern int16_t tempData0[];
void loop() {
  // put your main code here, to run repeatedly:

  static int16_t status=START_MODE;

  // basic menu to start and stop archiving
  if(Serial.available())
  {
    char ch=Serial.read();
    if(ch=='s') status=0;
    if(ch=='e') status=4;
    if(ch=='b') CPU_RESTART;
    if(ch=='p') _reboot_Teensyduino_();
    while(Serial.available()) Serial.read();
  }

  // check end of file
  status=checkEndOfFile(status);

  // if available transfer data to disk
  if(queue1.available()>=NBUF)
  { // fetch data from buffer
    for(int ii=0; ii<NBUF; ii++)
    { int16_t *buffer= queue1.readBuffer();
      memcpy(diskBuffer+ii*NSAMP, buffer, 2*NSAMP);
      queue1.freeBuffer();
    }

    // write data to disk
    //-------------------
    status=storeData(status);
  }

  // print some statistics every second
  static uint32_t t0=0;
  static uint32_t ic=0;

  if(millis()-t0>1000)
  { t0=millis();
    Serial.printf("\n%10d %2d %3d %.2f %6d %8x %8x %d",
        ic++, rtc_get()%60, AudioMemoryUsageMax(),
        (float) fsamp/(float)(disk_count*NBUF*NSAMP), tempData0[0],acqData,srcData,status);
    AudioMemoryUsageMaxReset();
    disk_count=0;
  }
}
The loop() function executes sequentially following task
check the USB-Serial line if there are inputs pending. Four types of inputs are programmed: ‘s’ to start the recording, ‘e’ to end the recording, ‘b’ to restart the MCU, and ‘p’ to put teensy into programming mode
check if the recorded files are to be closed
if sufficient blocks are on the record queue, fetch the data and store them of a large disk buffer.
store data to disk
print some useful information to USB-Serial line
The filing is implemented using a state-machine controlled by the variable “status”, where
status = -1 means filing stopped
status = 0 means ready to open file
status = 1 file is open ready to write header
status = 2 file is ready to write data
status = 3 file should be closed and made ready to open new file
status = 4 file should be closed and stop filing
status = 5 file should be closed and stop aquiring data
compile intruction#
From Arduino IDE the compilation of the SW needs the following setting under “Tools”
Board: Teensy 4.1
CPU Speed: “24 MHz”
USB Type: “Serial + MIDI + “Audio*
Listen to audio#
To listen to the audio, the PC Audio configuration should be (Windows)
Systems > Sound
Output: Speakers
Input: Digital Audio Interface
Systems > Sound > Mose Sound Settings > Recording > Digital Audio Interface > Listen
check “listen to this device”
Playback through this device: choose proper device
PC recording#
Use (e.g) Audacity to connect to Teensy to record to disk.
Repository#
The source code of the microPAM software will be maintained on WMXZ-EU/microPAM